Wednesday, December 21, 2011

Christmas Tags/Poinsettia Flowers

I have been playing with the Spell Binder Poinsettia flower dies - and I decided to put some on a tag for the gifts the boys are taking to their teachers. I decided against cards. I really like how these tags turned out. I probably could give more info - but the pain meds are kicking in and I am not thinking too well. Beyond my normal "not thinking well" sort of day.  If you have any questions -- ask and I will let you know!
 :o)
 The tags are done with a stamp from CTMH and it has white embossing powder. Then I used TH distress inks to color the tag. I just used the pad and wiped the ink on. Then I used a spritzer bottle of water with the pearl shade of the Perfect Pearls in it.
 This is a mauve irredecent paper that shimmers (the flower) I added Stickles in rock candy and it just didn't have the shimmer I wanted. So, while the stickles was still wet, I dumped some SU glitter on it -- and this is how it came out. The picture really doesn't do justice, I am so excited how it turned out!! This is for our "lady" teacher.


 This one is quite plain - but still very pretty. Braden has a male teacher this year, so I was trying to be festive and classic with it. No glitter, frills -- just simple. The center of the flower is a Martha Stewart sticker dot - it has a frosted sort of finish. I LOVE THESE!!

These are done on the Ranger tags. They are bigger - I think #8? I don't remember and I can't find the packaging!

These are 2 extra flowers. The silver/mauve one has lavender centers and the red one is out of SU cardstock and then I added the rock candy stickles -- and still wasn't what I wanted. I wanted to play with the Tattered Angels Glimmer Glam glaze and this color is the Twinkle Toes shade. It has a gold glimmer to it. REALLY REALLY cool!!  By the time I was done shaping this one - the finish reminds me of leather. Weird, huh?
 Leave me notes-- ask questions -- what ever - thanks for stopping by!

MERRY CHRISTMAS!!


Friday, October 7, 2011

Spoooookkkkyyyyy!! BOO!

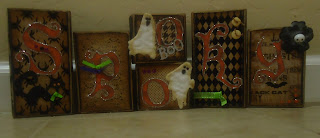
I picked up the Halloween edition of the Cricut Magazine. (those things are EXPENSIVE!!) But, there were lots of fun ideas in it for the Holidays.  I came across the wood blocks and I knew what my next project was going to be!  Dalven actually went out to the garage as soon as I showed him the picture and he cut a couple sets of blocks for me.

These really were fun to make, and I mostly scrap-lifted -- I did change a few things. I added the silver stickles around the letters and thought it really made the letters stand out more.  The sizes listed on the cuts were not right for some reason, so it took me a bit of time (and scrap paper) to get the letters to look right for my taste. The paper on the background is from the "Haunted" kit from MME. I used Vintage Photo TH distessed ink on all the paper edges and also roughed them up with my scissors.
The cuts of the letters, the black cat and the ghosts are from the Cricut Cartridge "Happy Hauntings".
The rest is odds and ends from my stash - rhinestones, ribbons, buttons and stickers.

And here it is!!  I am soooo happy with how they turned out. I think I am going to make a few more sets, and see about putting them on Etsy! What do you think?

Thanks for stopping by!


Saturday, August 13, 2011

Crafts For Sale List

Hi there -- I have some things I am cleaning out of my stash. Just trying to thin things out! Shipping will depend on how much you get - I will work with you to get the best possible shipping. I'm sure that first class could be cheaper than Priority - but I will check before we finish payments to double check what is best. Right now I am only accepting PayPal. If you want more info other than what I list below, just let me know and I will try to help.
Thanks for looking! (p.s. Most prices are open to "OBO" -- make me a reasonable offer and I'll see what I can do.)
~*~*~*~*~*~*~*~*~*~*~*~*~*~*~*~*~*~*~*~*~*~*~*~*~*~*~*

$3.00 Wheel Guide I am horrible on the names of things. This is the Stampin Up guide for the roller stamps. If you want to do wrapping paper or larger lines of the wheel stamps, this helps keep your rolling stamp strait.

$2.00 - "It's about you" new-unmounted double sided stamp. Stampin Up - Sayings are: "So very happy for you" -- and "You are in my thoughts"


$5.00 -"Out of the Box" never used. Mounted.

$7.00 "Abundant Hope" - Stampin Up - never used. Cling set.

~*~*~*~*~*~*~*~*~*~*~*~*~*~*~*~*~*~*~*~*~*~*~*~*~*~*~*~*~*~*~*~*

Saturday, April 16, 2011

BOOM!!! hee hee hee

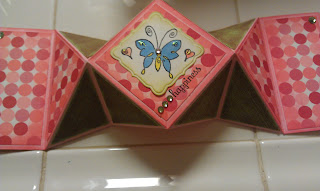
I picked up the new June 2011 (yeah -- JUNE) issue of Stamp & Scrap and they had the cutest card that I just HAD to try -- there are still a couple others, but here is the one I started with!
It's called and Explosion Card! How cute is this???
But, wait!! It gets better!! Look now -- it EXPLODED!!


I used my copics to color the butterfly - it has stickles on the wings and the little hearts - I used my Tim Holtz "Worn Lipstick" distress ink on the pink circle paper, and I used Core'dintaion paper (sorry - not sure of the name - it's the brown with green underneath).
The stamp set was from Stampin Up. It's from Merci (a Sale-A-Bration set) and the sentiment is from Fabulous Phrases.

Thanks for stopping by!

Saturday, April 2, 2011

My First Tilda

Okay -- I gave in. At first, I wasn't sure about the Tilda stamps.... and then I saw the one with the tulips... (not to mention the ones I have on pre-order - ssshhh-- hubby doesn't know yet....) Tulips are my most favorite flower!
Anyway -- I've been practicing coloring. I used my Stampin Up water color crayons and blender pens. (My Copics are not here yet - hubby knows about them. But I am going to be limited in colors for now.)
I used my crayons, they are my most favorite medium to use. I'm pretty comfortable using them, so I thought it would be best to use what I know. Ya know? ;o)

Okay -- the Tilda in blue is my first one - just getting the hang of coloring her in - not much shading (there is a bit) and then I did the pink one - trying the hair/lighting techniques.


Now - remember these are not finished to use in a card - I'm just playing! I hope the pics are good enough that you can see them. Any help/suggestions that you can offer -- please feel free!!
I've also added a pic of them side by side to see the difference. Please don't pay attention to the smudges in the middle -- I had a little help from a certain little person with sticky fingers. And, no - it wasn't the hubby... ha ha
Leave me a message, and thanks for stopping by!

Sunday, February 6, 2011

Finding ANY Groove

I am finally taking the time I need to work on the little things. So, this card is getting back to where I should be -- but I'm not all the way there. I"m getting there. This card took me the better part of a week. I got everything stamped and there it sat for a number of days. Tonight through the Super Bowl, I colored and cut. I stickled and brad-ed. (It's my blog - I'll make up words if I wanna. ha ha)

So this is a stamp set from Stampin Up - awhile back. It was a Level 3 Hostess set. (one of the perks of being a demonstrator for them!) This is one of my all time favorite sets in the world. At least the top 3! Okay -- so here it is. I think I like it. The ribbon is from the stash, I'm pretty sure it came from Wally World. I am starting to get the hang of distressing. So, the edges are done a little. The papers are SU papers from the Brights set. (When there was one....) If I missed something you want to know about - please ask! Thanks for looking. P.S. Sorry about the picture - it was either this one with a glare or one with a really bad shadow - I chose the lighter one.

Monday, January 31, 2011

Valentine Trial

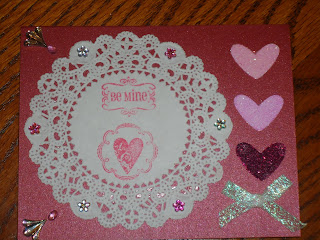
So - -I am still not back to where I wanna be - and I was just playing with little things. These are from the dollar bins at JoAnns and Michaels. The stamps were the mini stamps out of the bins, the little sparklies are stickers from the cheapo section ( a bit more than the dollar bins... lol) I had a different idea with the paper doilies, but it didn't work, so I was playing around with them.
I did use Core'dinations (is that spelled right?) pearls paper.

One picture is going to be pretty bad, it had the flash on, but it shows the pearly of the paper.
I need to break out the Cricut and start getting swirly embellishments cut out, and background things. I think it would help more.


So this is the one with the flash, it shows the pearly paper better.
This one was stamped in "Ruby Red" ink and used all 4 hearts.
I punched out the hearts with a Stampin Up punch - has 3 different hearts on it. I ran them through my Xyron sticker maker, put my glitter on, and then ran it through the Xyron again the other way. If I left any details out -- lemme know and ask..... thanks for stopping by.

Wednesday, January 19, 2011

Baptism Invites and Birthday Princess

Well -- my boys are turning 8 on Friday - and I am working on the invites for their baptism day. They are turning out okay - sorta plain, but since the pink unicorns and sparkles were turned down (I know,crazy, right??) Sooo... this is what I came up with. Riley has been "red" and Braden has been "blue" since birth -- I always color coded them for family. We always lived so far away from the families, so it was just the easiest way I could think to make sure everyone knew which baby they were looking at! So -- that is where the red and blue comes in. The silver is just aluminum foil -sent through the Xyron to make it sticky - then I sent it through the crinkle thingy to give it a bit of texture. When I pulled it off the backing it straitened out more than I would have liked, but still wasn't just flat foil. Then, the CTR stamp (from Sunbeam Stamps) was stamped on Stampin Up cardstock with silver ink. Cut them out, and then put a layer of clear embossing powder over them to give them a bit of shine and seal the silver ink - - I hit it with a heat gun and still would smear, so I fixed that by sealing it! :o)
Now, the highlight of our day was celebrating the 1st birthday of our baby girl, Madilyn. I can't believe her first year has gone by so quickly. Here are some pictures of her this morning, wearing her princess crown we got at the party store. She was soooo cute, she wore it quite a bit today -even to get her brothers from school. How stinkin' cute is she?? (I admit, I **MAY** be a tiny bit biased....) But, everyone always says how cute she is -- that many people can't be wrong, can they??
And this evening, she got her very own cupcake -- and she loved ever little bit of it! She started out very dainty - just a finger or two in the icing.... and then---

As you can see -- things got a little out of control -- then she started getting tired - and rubbed her eyes, then the hair..... This is the final product - just before the bath! It was a great day -- even if mommy is too emotional about her baby having her first birthday! (that is a kitty scratch above her eye....)