Monday, September 10, 2012

Close To My Heart

I've joined up with Close To My Heart, and I really am excited. I love everything about them!
I recently made an order for some Halloween items and came up with a new project and wanted to share it!

I purchased one of the "My Creations Bracket Frame"and also the Moonlight Workshop on the Go sets, and mixed, matched, glued and stamped. The end result was this diorama! :-) I am VERY happy with how it turned out. I just really wish the photos would show the depth to it and the layers. The kids told me how much they liked it!

Anyway - here it is! If you are interested in making one, let me know and I can help you get the items needed and some directions!  


A strait on view, it's not very easy to see the depth of it.


A little bit of an angle to see a little better of the layers of things.
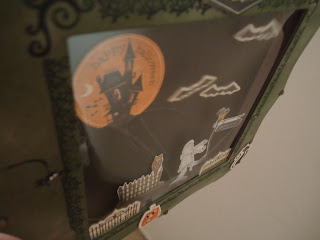
A little different angle to see the different things inside. The little bats are on black thread, hanging from the inside top of the frame.

To order the Moonlight Scrapbook Workshop on the Go -   http://beckypursell.ctmh.com/Retail/Search.aspx?SearchValue=g1051

Bracket Frame - http://beckypursell.ctmh.com/Retail/Product.aspx?ItemID=6790&CatalogID=1216

Moonlight Compliments (chipboard pieces) http://beckypursell.ctmh.com/Retail/Product.aspx?ItemID=6733&CatalogID=1825

Friday, August 10, 2012

My newest creations

I am completely, hopelessly obsessed with Wee Stamps. (I made a clicky linky thing for you if you feel the need to go look at the other images you can find on Wee Stamps.) Okay, so it's a controlled obsession, or maybe it's just an intense infatuation?  Anyway, here it is.  My first digi image (see? I even speak the lingo! For you non-computer artsy people, digi is short for digital image) I colored from Wee stamps is "Goldie". You can click on any of my pics and it will make them bigger for you to see better. Yeah, I'm cool like that.
I know, I know. She should be made into a cute card. I haven't gotten that far, yet. I was sidetracked with new pictures to color.  With that being said, a lot of you have already seen "Hazel".  I just had to have her, as I really LOVE Halloween!
I just LOVE her!  

Okay, so on to the new ones!
This is "Mountain Lily" .... I really like how she turned out on the coloring, I'm not so sure about how the card came together. I am struggling with getting the card part of all of these done.
Okay - here is Lily-
I have new stamps for the back of my cards - and I LOVE it!  So, I thought I would share what they are! (If you feel the need to want one of these stamps - leave me a message and I will let you know more about them.)

It's the "work of art" stamp - and I have one that goes on the envelopes, too.
And I've saved my favorite for the last. I am SOOOO thrilled with how she turned out. She is called "Silver Fairy"  And I think she is my most favorite on the whole site!! 

And a little bit closer to see her details.

 Yeah, I'm not good at all on telling about the supplies that I used. SSOO -- if you see something specific you like, just ask and I will try to tell you what I used. 
Leave me messages, and let me know what you think! Thanks for stopping by!


Tuesday, July 24, 2012

Stamps (and stuff) for Sale

I have other items listed on my etsy store as well - look for the "destash" section.

 SU Rough Type  $9.00 shipping included

I don't know the brand - possibly Inkadinkadoo  $5.00 shipping included
polkadot alphabet $5.00 - shipping included

Sandy Shells (never used) $6.00 - shipping included
Candy Cane Craze $6.00 shipping included
Sassy Sparkles - never used  $7.00 shipping included
SU Petals  $7.00 - shipping included
SU Doodle  $7.00 plus shipping
SU - Whimsy  $7.00 shipping included


SU Bold Butterflies (2 step stamping) $12.00 shipping included
Out of the Box hostess set (never used) $6.00 shipping included

Sunday, July 8, 2012

Goldie - Wee Stamps & Marker Review of sorts

I've been working on learning to use my alcohol markers. I have a mixture of Copics and Noirs.  I am finding they are comparable, but also have very obvious differences.  I most generally have used the brush ends, and Copics tips are very flexible compared to the fine tip of the Noirs. The fine, firm tip of the Noirs are very nice for getting into tiny areas without going over into other areas of your design. The flexible tip of the Copics help get a more even coverage of larger areas. So, yes, I am seeing the positives and negatives of each brand. One negative that I see of either brand-- I don't have enough!!  HA.  Definitely need to work on getting a more varied collection of shades.

Now, I am new to digital stamps. I have only purchased a few here and there, as I am usually one that likes to get my fingers inky with stamps! :-)   And, I am VERY good at getting messy, even when trying to stay clean.   I purchased "Goldie" from Wee Stamps  by Sylvia Zet, and I will be going back for more!  I really want to get "Hazel" next!  You can also get rubber stamps of these from Whimsy Stamps.

Anyhooo -- back to "Goldie".  I used my Copics, Noirs and also my Sakura Gelly Roll pens. They have TONS of sparkle and are quite reasonably priced, in my opinion. I bought both sets of "Stardust" pens. (Bold Galaxy, and Bold Meteor) I really love the sparkle they add.  I also have one lonely little Wink of Stella pen in clear that I love! (I am getting a bigger set, soon!!) I used the Wink of Stella on Goldie's cheeks to add a sparkle to her face.  In this first picture, you can see her tail sparkling from the Sakura pens.

 I tipped this photo towards the light, in hopes of catching more sparkles. She has purple glitters through her hair, too. The little pink flowers have the Wink of Stella clear sparkle on them, as well. Now, I hope no one is wanting to know the shades I used of the Noirs and Copics, because I failed in this section! I didn't make notes of what I used.  Oops.  I will get better about noting what I use - I promise!

 If you are interested in either Noirs or Copics, you can leave me a message here on the blog, and I will get back to you with more info! (and to spill the beans, just a little - Dalven and I have opened an account with a craft supply wholesaler. We will be adding crafting supplies to our Etsy shop, we are waiting on our first order to be delivered early next week!) If there are specific supplies you need, let us know and we can check availability, special orders are more than welcome!  We will be starting small, but hope to continue to add new items regularly. Visit our Everlasting Seasons Etsy shop to see what we are up to! This is also where we put our finished crafts up for sale.  Thanks for visiting my blog!

Wednesday, January 4, 2012

Unfinished Canvas Project

I kept seeing this project in my head - and it's still not done. But, it's coming along how I imagined, so far... Well, mostly.  I had some "help" at one point from a bitty Tasmanian devil that runs this house, and she just about got banished for the time being. Since she is cute, I kept her. But, next time... well... just watch out.
;-)

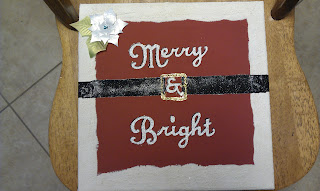
So - I had 2 thoughts with this - either tie a big bow and make the canvas look like a gift box - or do this with it.

Guess it's not the best picture -- but I started by painting the whole canvas a deep red color. The "Merry & Bright" is a Sizzix die.  I actually cut this out twice - once in silver and once in black to make a shadow behind the silver. I just off set it when I glued it all together. The silver is from the brand new DCWV "the dazzle stack"  papers. (LOVE THESE!! OMG!) and the gold is gold Stickles.The black is some black glitter paper that I've had forever -and I got it at Wal-Mart. I also lined that out with Black stickles. Now, the white all around is Ranger's "Puffs" embossing powder. I did a couple layers of it.

The flower is a Spellbinders die. The new poinsettia die. It is beyond cool. Love the way it cuts and how these turn out. You can see that I used them on the tags on the earlier post for the kids teacher gifts.

So, this project isn't finished. I haven't decided exactly what else I want on it. The flower isn't glued down, but I think I really like it, so I think I will add some more. Maybe put some in the opposite corner as well. It may be July when I get it figured out - but then I won't be late for Christmas -- I'll be really early for the next one! :o)

If you see something that I forgot to mention - just ask! I'll try to tell you what I've done.

Wednesday, December 21, 2011

Christmas Tags/Poinsettia Flowers

I have been playing with the Spell Binder Poinsettia flower dies - and I decided to put some on a tag for the gifts the boys are taking to their teachers. I decided against cards. I really like how these tags turned out. I probably could give more info - but the pain meds are kicking in and I am not thinking too well. Beyond my normal "not thinking well" sort of day.  If you have any questions -- ask and I will let you know!
 :o)
 The tags are done with a stamp from CTMH and it has white embossing powder. Then I used TH distress inks to color the tag. I just used the pad and wiped the ink on. Then I used a spritzer bottle of water with the pearl shade of the Perfect Pearls in it.
 This is a mauve irredecent paper that shimmers (the flower) I added Stickles in rock candy and it just didn't have the shimmer I wanted. So, while the stickles was still wet, I dumped some SU glitter on it -- and this is how it came out. The picture really doesn't do justice, I am so excited how it turned out!! This is for our "lady" teacher.


 This one is quite plain - but still very pretty. Braden has a male teacher this year, so I was trying to be festive and classic with it. No glitter, frills -- just simple. The center of the flower is a Martha Stewart sticker dot - it has a frosted sort of finish. I LOVE THESE!!

These are done on the Ranger tags. They are bigger - I think #8? I don't remember and I can't find the packaging!

These are 2 extra flowers. The silver/mauve one has lavender centers and the red one is out of SU cardstock and then I added the rock candy stickles -- and still wasn't what I wanted. I wanted to play with the Tattered Angels Glimmer Glam glaze and this color is the Twinkle Toes shade. It has a gold glimmer to it. REALLY REALLY cool!!  By the time I was done shaping this one - the finish reminds me of leather. Weird, huh?
 Leave me notes-- ask questions -- what ever - thanks for stopping by!

MERRY CHRISTMAS!!


Friday, October 7, 2011

Spoooookkkkyyyyy!! BOO!

I picked up the Halloween edition of the Cricut Magazine. (those things are EXPENSIVE!!) But, there were lots of fun ideas in it for the Holidays.  I came across the wood blocks and I knew what my next project was going to be!  Dalven actually went out to the garage as soon as I showed him the picture and he cut a couple sets of blocks for me.

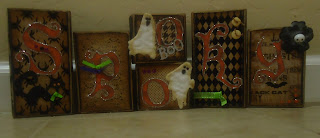
These really were fun to make, and I mostly scrap-lifted -- I did change a few things. I added the silver stickles around the letters and thought it really made the letters stand out more.  The sizes listed on the cuts were not right for some reason, so it took me a bit of time (and scrap paper) to get the letters to look right for my taste. The paper on the background is from the "Haunted" kit from MME. I used Vintage Photo TH distessed ink on all the paper edges and also roughed them up with my scissors.
The cuts of the letters, the black cat and the ghosts are from the Cricut Cartridge "Happy Hauntings".
The rest is odds and ends from my stash - rhinestones, ribbons, buttons and stickers.

And here it is!!  I am soooo happy with how they turned out. I think I am going to make a few more sets, and see about putting them on Etsy! What do you think?

Thanks for stopping by!